
Nothing is quite as satisfying to eat on a holiday weekend as some nicely smoked ribs. The ribs are cooked “low and slow” in order to achieve a massively rib-iculous tender and smokey taste that is worth all the time and effort. There’s a lot of technical info here to achieve amazing ribs, so let’s skip the long introduction of how they remind me of my childhood days and dive right into it. Buckle up, and get ready for an amazing information dump.
3-2-1 Method
One of the most tried and true ways to smoke your ribs is with the “3-2-1” Method. But what is the 3-2-1 Method?
1) The “3” stands for the first three hours that you are smoking your ribs. Your ribs will be exposed to a constant supply of smoke from a hardwood chunk (I used cherry for this time) Generally, the ribs are placed in the grill uncovered and allowed to smoke for three hours
2) The “2” stands for the next two hours, in which your ribs are sprayed with liquid (ex. apple juice), and wrapped in foil. These next two hours braises the meat in liquid and makes it really tender.
3) The “1” stands for the final hour, which a nice layer of your favorite BBQ sauce is applied. Your ribs are pretty cooked at this point, but this final hour really helps lock in the sweet and savory glaze of the sauce into your ribs.
In total, you will look at six hours of cooking time, so best to start early and plan accordingly!
Low and Slow Snake Method
The art of smoking meats requires a low and consistent temperature that can last for long periods of time. If you have a Weber Kettle like I do, the snake method is an effective way at achieving this.
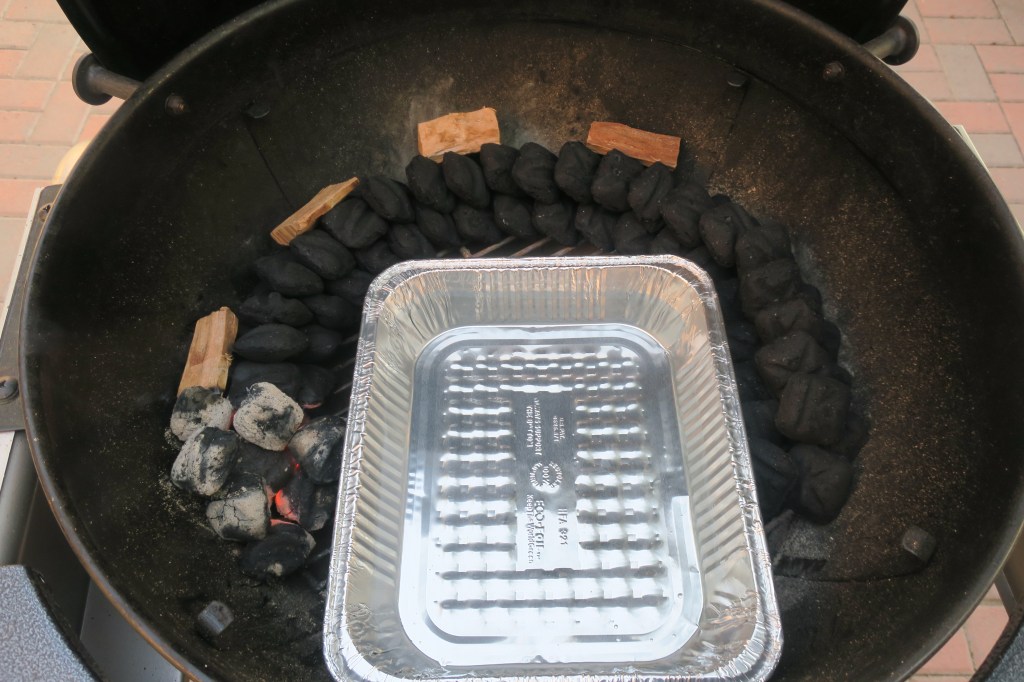
The diagram above depicts this “Snake Method” just as we begin cooking. If you are using Kingsford charcoal briquettes, you’d want to lay them as pictured. The briquettes are in two layers: two briquettes at the bottom layer, and one at the top. Four large wood chunks are set up at the beginning of the snake. The “smoke” flavor that comes from your wood tends to bind to your meat at the beginning of the cooking process, so you would want to place the wood at the beginning of the snake. Light up 9-10 briquettes and place them at the beginning of the snake, making sure the first wood chunk gets lit from this. This should give you a steady 225°F-250°F temperature (a temperature probe will help you monitor the temperature).
A pan filled halfway with water is needed and will be greatly helpful in maintaining temperature as well as keeping your meat moist during the long cook process.
One thing to also note, is you want your lid vent to be the opposite direction of where your charcoals are currently lit. This will force the smoke to travel through the meat to the opposite direction. If you are placing the top lid vent directly where the coals and wood are lit, all that smokey flavor is going to float straight out and not into the meat.
The combination of the 3-2-1 Method and the Snake Method is a great way for you to smoke your ribs (and other meats) on a Weber Kettle!
Ingredients (for three full rack of ribs)
-3 full St Louis pork ribs
-BBQ sauce (I used Kinder’s Mild BBQ)
-Apple juice, to spritz
Dry Rub
-1/2 cup brown sugar
-4 tsp Kosher salt
-4 tsp black pepper
-4 tsp smoked paprika
-2 tsp garlic powder
-2 tsp onion powder
-1 tsp ground cinnamon
-1/2 tsp cayenne pepper
(Dry rub is adapted from Hey Grill Hey’s Dry Rub)
Useful Tools
-Weber Kettle Grill
-Kingsford Charcoal Briquettes
-Kingsford Wood Chunks (I like using Cherry wood, amazing aroma, flavor, and better smoke ring)
-Spray Bottle
-Aluminum pan
-Foil wrap
-Probe thermometer (I used ThermoPro TP20)
-Rib rack (if making more than 1 rack)
Procedure
Rib Silver-Skin Membrane Removal
1) If this wasn’t already done by the butcher or store, remove the silver-skin membrane from the backside of the ribs. This membrane is very tough and non-porous to your dry rub, so no flavors can penetrate through. You definitely want this removed or your ribs will lack flavor. Here is a video that shows how.
Dry Rub
1) Combine brown sugar, Kosher salt, black pepper, smoked paprika, garlic powder, onion powder, ground cinnamon, and cayenne pepper into a mixing bowl.
2) Pat your ribs dry, then rub generously onto all sides of your rib
3) Let your rib sit in your rub covered in plastic wrap at least four hours (preferably overnight)

Cooking Ribs
1) Set up the grill to have the Snake Method as described above. Maintain a steady 225-250°F temperature.
2) Place your ribs in the grill (away from the coals, on top of water pan). Close the lid with the vent facing furthest away from the lit coals.

3) Allow ribs to smoke for three hours (halfway through, open lid, rotate your ribs to allow even cooking, and spray on a little apple juice.
4) After three hours, take ribs out of grill. Spray each side with apple juice and wrap in foil.

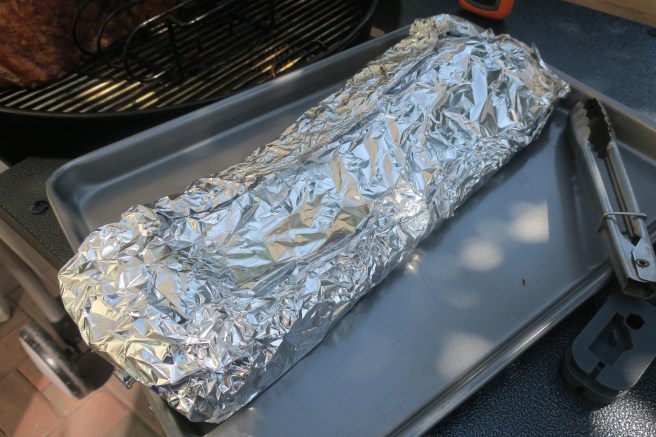
5) Place foil wrapped ribs back in the grill and smoke for another two hours
6) After two hours, remove ribs from grill and take off foil wrap. Brush generous amounts of BBQ sauce onto each side of the rib
7) Put the BBQ-brushed ribs back into the grill for one more hour
8) After one hour, remove the ribs. Allow to cool, and enjoy!

Observations/Tips
-I love cherry wood for it’s ability to change the color of the meat. It gives a really great smoke ring to your ribs!

-I was smoking these ribs during a heat wave, with outdoor temperatures reaching 100°F. This can affect your grill temperature as well. To help with this, you can cover your grill with an umbrella to give it shade.
-Probe placement matters! If you place your probe directly on top of lit coals, you will freak out because the temperatures will read 400-500. The amount of meat you have placed in the grill also affects the temperature reading as well, so keep that in mind.
References
–Hey Grill Hey’s Best Dry Rib Rub
–Cooking Guide’s Video on Rib Membrane Removal
–Perth BBQ School’s Snake Method Tutorial
